Dark chocolate & banana collagen crépes

They put collagen in everything these days…

For a good reason, though! 🙂

Collagen is so good for you: it is an actual powerhouse supporting your joints, skin, hair, nails and even your digestion by coating your gut lining.

We want all of that, don’t we?

So start your day on a positive note with these collagen crépes:

dark chocolate-banana collagen crepes with powdered erythritol
dark chocolate and banana collagen crepes for breakfast with a low-carb option

I’ll be honest: it took me two tries to actually get crépes and not a scrambled/cooked batter mess, but I am happy with the result after all!

I have a tendency to become sad when I screw up a recipe… But failed recipes happen and are okay. Like for example that time when I burnt my surprise cookies for Husband… He assured me that he loves me nonetheless. And ate them, eventually. 😀 Isn’t he the best? (Don’t worry, though, they weren’t THAT bad.)

This recipe is very simple, flipping the crépes is a bit tricky though, but it’s absolutely worth it!

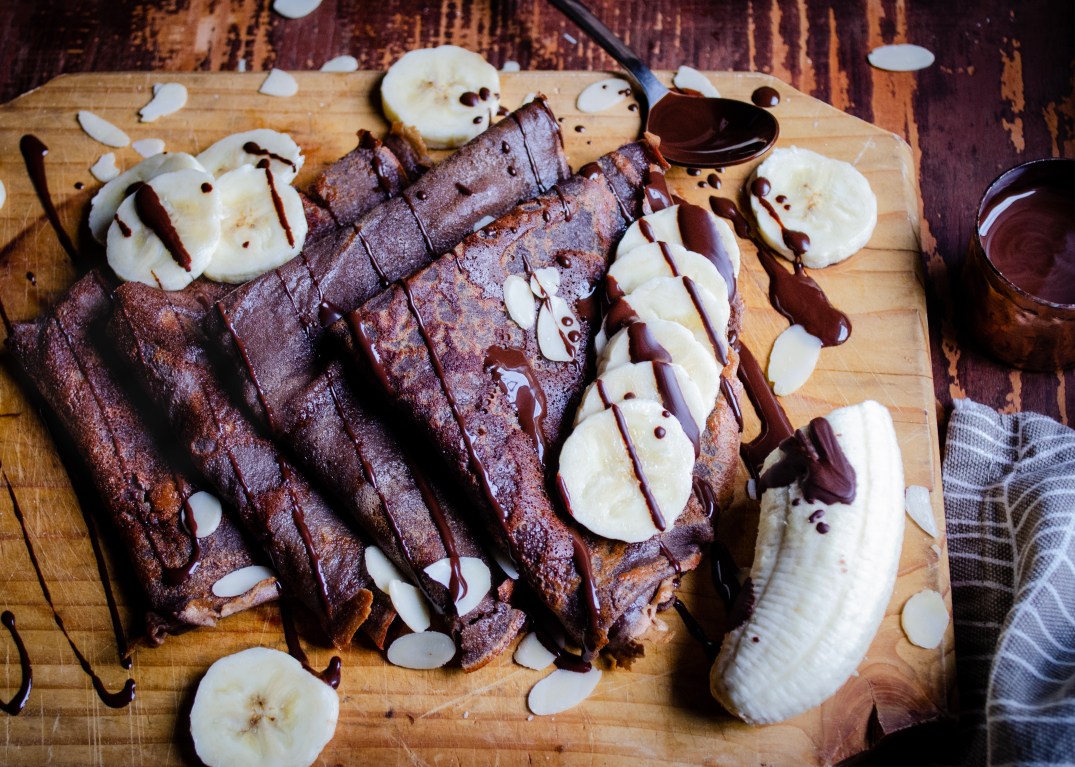
I mean, look at those TEXTURES!

collagen crepes for breakfast or dinner topped with bananas and melted dark chocolate

These crépes will provide you with a nice dose of protein, healthy fats, antioxidants and will keep your blood sugar level at bay as well.

Sounds good to me. 😉 What about you?

What is your favorite way to eat crépes or pancakes?

Let me know in the comments below, I’m curious! 🙂

With love,

signature

decadent dark chocolate and banana collagen crepes for breakfast

Dark-chocolate & banana collagen crépes

Prep time: 5 min
Cooking: 15 min
Total: 20 min
Yield: 4 crépes

Ingredients:

  • Ghee or coconut oil for cooking
  • 3 whole eggs, beaten
  • 1/4 cup collagen peptides
  • 1/4 cup organic coconut milk or plant milk of your choice
  • 2 Tbs almond flour
  • 1 tsp cinnamon
  • 1/4 tsp Himalayan pink salt
  • 1/2 Tbs raw cacao powder
  • 1 Tbs agave (optional, skip for a low-carb version)

Instructions:

1. Start heating up ghee or coconut oil in a large skillet.
2. Add the rest of the ingredients to a blender to process until smooth.
3. Pour approximately 1/3 cup of the batter into the skillet at a time, this will make about 4 crépes.
4. Spread out the batter until thin and cook both sides until they are golden brown.
5. Fill with yogurt and/or simply drizzle melted dark chocolate over it and serve with bananas.
6. I may have sprinkled some powdered erythritol on top as well. 😉 Sooooo delicious!

Szuper gyors fokhagymás-spenótos spagetti, aszalt paradicsommal (gluténmentes, tejmentes)

Ugrás a recepthez⬇

Tudjátok, vannak azok a receptek, amiket úgy reklámoznak, hogy 15 perc alatt elkészülnek?

Na hát, ha őszinte akarok lenni, nekem azok általában inkább 30 perc alatt jönnek össze.

Ez a recept viszont TÉNYLEG csak 15 percet vesz igénybe. Becsszó. 🙂

Gyors és finom – nálam egy nyerő párosítás 🙂

garlicky spinach pasta with sundried tomatoes captured via dark food photography
garlicky-spinach gluten-free pasta on a fork

A recept glutén- és tejmentes, és tényleg egy szempillantás alatt elkészül. Úgy értem, ha naaaaaaaagyon lassan pislogsz… 😉 na de komolyra fordítva a szót,
ezzel a tésztával tényleg nem kell órákat tölteni a konyhában, a végeredmény ráadásul igazán ízletes és csábítóan krémes lesz!

A mennyiségek könnyen skálázhatók, ha esetleg több személyre főzöl.

Remélem, kipróbáljátok! Ha igen, mindenképp mutassátok meg Facebookon vagy Instagramon! 🙂

Szeretettel,

signature

a 1x1 image for the recipe part of this post about garlicky-spinach gluten-free pasta

Fokhagymás-spenótos spagetti, aszalt paradicsommal (gluténmentes, tejmentes)

Előkészület: 2 perc

Főzési idő: 13 perc

Összesen: 15 perc

Hozzávalók (2 adaghoz):

  • 180-200 g száraz gluténmentes spagetti tészta
  • 1 ek. ghí vagy kókuszolaj
  • 3 gerezd fokhagyma, összezúzva vagy felaprítva
  • ~100 g friss bébi spenót
  • 3/4 csésze kókuszkrém/kókusztejszín
  • 1/4 csésze száraz fehérbor
  • frissen reszelt szerencsendió
  • só & bors
  • néhány darab olívaolajban eltett aszalt paradicsom

Elkészítés:

  1. Lobogó sós vízben főzzük meg a tésztát (vízforralóval előforralva a vizet rengeteg időt nyerhetünk)
  2. Míg a tészta fő, egy serpenyőben felhevítjük a ghít/kókuszolajat, majd rádobjuk az összezúzott fokhagymát és a bébi spenótot.
  3. 1-2 percig kavargassuk, majd fedő alatt addig főzzük, amíg a spenót megfonnyad (pár perc).
  4. Adjuk hozzá a kókusztejszínt, a fehérbort és a szerencsendiót, sózzuk, borsozzuk és rottyantsunk még rajta egy utolsót.
  5. Keverjük össze a megfőtt tésztával és a feldarabolt aszalt paradicsommal. Jó étvágyat! 🙂

Blueberry-lemon chia jam + a healthy snack idea

Quickest jam recipe ever.

Are you ready?

4 ingredients and 10 minutes is all you need.

Look how pretty!

blueberry and lemon chia jam with lavender

This jam recipe works with any fruit, really. But since I’ve been reading about the gazillion reasons why blueberries are so good for us, this time I made them my nutritional “weapon of choice”.

Also known as “brain berries” thanks to their ability to improve memory, cognition and overall brain health, blueberries are also a rich source of powerful polyphenols: antioxidants that help you get rid of unwanted free radicals, reduce the risk of cancer, alleviate inflammation and amp up weight loss.

blueberry-lemon-chia-jam-stock-ready

And about that snack… which is my new favorite and can totally be your “I-just-got-home-from-work-I-am-famished-and-immediately-want-food-in-my-face” kind of dinner as well: toast + butter or ghee + this blueberry-lemon chia jam + arugula. Perfection.

healthy snack idea toast with blueberry lemon chia jam with butter and arugula

Fun fact: fat makes polyphenols more bioavailable to your body, which means it helps them be absorbed more easily, so you want to consume polyphenol-containing food with a type of healthy fat to reap their benefits fully. Which is why I’ve been munching on the above mentioned combination.

Oh, and a side note: yes, butter is a healthy fat. Not all butter is created equal, though. Opt for organic grass-fed, if you can, as it contains fat-soluble vitamins and supports brain health as well.

And I haven’t even mentioned the chia seeds that are “hiding” in here too! Can you believe these tiny little seeds hold so much goodness in them? Fiber, essential fatty acid omega-3, protein, minerals and vitamins… and they’re actually one of the best dietary sources of calcium.

I’ll be honest, I’m not a huge fan of chia seed pudding. I was up for the hype and *tried* to like it, but we never did get too friendly… I don’t hate it, but I’d much rather have the seeds raw just on top of my morning oatmeal or smoothie bowl.

THIS jam, though…

yummy blueberry lemon chia jam

It’s a different story.

It’s absolutely amazing! It blew my mind how simple it is to make, yet it’s so yummy and nutritious at the same time.

I chose agave for sweetening, because I brought the jam to a quick boil while making it, and – unlike honey – agave syrup won’t get damaged when exposed to high heat. It is, however, also possible to just mix the ingredients in a blender without any heating, in which case it is perfectly okay to use honey.

Blending will obviously result in a more puree-like consistency, I personally like the texture of whole blueberries, so I went with the first method.

blueberries for making blueberry lemon chia jam

You should absolutely, definitely, undoubtedly try this recipe, it is a 100% natural and sugar free, made with wholesome ingredients. You’ll be puffing out your chest, boasting about your own homemade jam that you whipped up in literally 10 minutes!

And you should be puffing out your chest with confidence anyway, every day, because hey! You’re amazing!

Please remember that and have a lovely day! 🙂

Don’t forget to say hello on Instagram. #allwithzest

With love,

signature


blueberry lemon chia jam
Blueberry-lemon chia jam

Yield: 2 cups
Prepare: 2 minutes
Cooking: 8 minutes
Total: 10 minutes


Ingredients:

  • 2 cups fresh or frozen blueberries
  • 2 or 3 Tbs agave syrup, depending on the sweetness you prefer (or honey)
  • 1 tsp lemon juice
  • 2 Tbs chia seeds

Instructions:

  1. If using frozen berries, let them thaw for a little while in the pot you’re going to use.
  2. Add agave syrup and turn on the heat to medium, gently mash the fruit with the back of a wooden spoon and bring it to a boil.
  3. Turn off heat and add lemon juice and chia seeds too.
  4. Stir well and wait until it’s completely cooled down. The jam will thicken, don’t worry!
  5. If you opt for the no-heat-involved method, simply add all ingredients in a blender and blend until you reach the desired consistency. The more you blend, the more jelly-like your jam is going to be.
  6. Transfer to a glass container and keep in the fridge for about a week. Or less. 😉